Getting started with the Google Nik Collection (it's FREE!)
- Apr 7, 2016
- 4 min read
If you haven’t heard yet Google just did an amazing thing – they made the entire Nik Plug-in collection available to download totally free of charge. This is huge deal for photographers, especially those who are perhaps starting out and can’t justify splashing out an endless variety of software applications, when Photoshop itself already cost them an arm and three legs (I know some really strange people…) With this announcement, everybody can now give their images the Nik treatment – creating looks that aren’t really obtainable using any other software. To celebrate this massive event, here are five quick tips for starting out with the Nik collection. Enjoy.
Don’t be afraid of presets
One thing the Nik Plugins do very well are filter presets. In many applications preset settings can often play havoc with your carefully composed, delicately exposed images by adding unwanted and sometimes unexpected effects and image artefacts. Most of the time I steer clear of suggested or ‘auto’ settings and often advise others to do the same. In this case however you can relax a little – Nik’s filters have useful and incredibly usable preset options. So much so, a lot of the time I and many other photographers I know, are happy to simply select one of the many presets on offer and leave it at that – they’re that good. In HDR FX pro, where there are many features of the image to control, I might do a little more tweaking, but in other applications such as Silver FX pro (used for Black and White conversion) there are some automatic ‘recipes’ that are perfectly suited to a range of different image styles. It never ceases to amaze me how effective these are – one click and you’re done. Whilst there are times you’ll want to take more creative control, don’t be afraid to try out a preset or two and see how close they get your images to being truly ‘finished’.

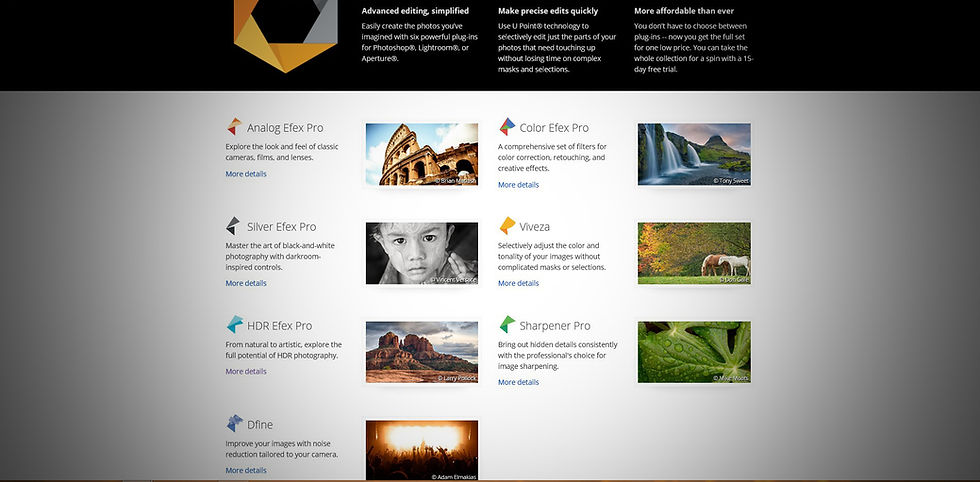
Don’t forget to apply more than one filter
One of the great things about the Nik collection is that each application is designed to do a limited number of functions very, very well – each has a specific purpose and as such the effects of each can be easily combined to produce a fully polished image. Therefore don’t think you have to pick one and apply it in isolation. It’s called a collection for a reason – the best images can be created by subtly using each tool to enhance the particular aspect of your image it was designed to work on. It might not always be necessary to make use of every filter available (in fact, be careful you don’t get tempted to do this if you don’t have to; the operative word is subtly) but if your instinct tells you get creative with a variety of the collection’s features, you’re photo will probably benefit from doing just that.

Make the most of Control points
A signature feature of Nik software is their Control point technology, whereby you can place edit pins around your image and adjust local exposure, colour and contrast. It’s a brilliant premise and if you’re used to using the Adjustment Brush in Lightroom or Camera Raw you should fall right into step with it. Simply select the Control Point tool, drop in a pin, adjust the radius (the size of the area over which the effect is applied) and make your enhancements where they are needed most. Tip: don’t forget to expand the adjustment drop-down on the control point itself (the little arrow at the bottom of the slider stack) as this opens up the whole array of editing sliders.
Remember you can apply filters on a brush
This is a big one – probably the coolest aspect of Nik’s filters is that they are applied on a layer of their own, just like a regular adjustment layer in Photoshop, meaning you can instantly target the effects to a specific area. Even though you can use the Control Point options, the ability to brush in an effect is one that feels very natural and familiar to Photoshop users and offers huge creative possibilities. It does of course enable ‘colour splashing’ – you know, where you make an image B&W and then bring back the colour in an isolated area - although this is a little bit of a crude example. The true benefits become clear when you come to target Noise Reduction using the Define Plugin or Sharpening using Sharpener Pro, where you’ll often want differing effect densities on the sky and high-detail foreground areas of your images (which is most of the time by the way.) This whole local adjustment philosophy will make you love Nik Software even more. Trust me
Set up a work flow
Okay so we’ve already discussed the benefits of applying multiple Nik filters to your images, so the logical next tip is to promote the idea of setting up your own Nik workflow. It’s clear that these applications are designed to be integrated, so in order to make the most of what they have to offer it’s a great idea to base your new editing schedule around the Nik Collection, so that you apply the filters when they’re necessary and in the right order. Of course the order will depend on your image and your own editing style and intentions but mine goes something like this; HDR FX pro (if HDR is what I’m doing) – Colour FX Pro/Viveza (for sophisticated colour enhancement) – Sharpener Pro (for subtle and appropriate sharpening depending on whether my shots are destined for web or print) – and finally Define (for precise noise control, adjusted to complement the amount of noise generated by all the previous software treatments.)
Conclusion
The Nik collection is a fabulous toolkit for advanced and intelligent image editing and I promise that if you use it with restraint it will give your images something extra. Whilst Google is probably an evil organisation hell bent on world domination and the creation of a satanic, dystopian society where we all get liquefied at age thirty and turned into little green pills, I think you’ll agree all of this can be forgotten in light of their amazing gesture with making Nik’s tools free for everyone. At least you will after you try it…
Now go and hide in your basement and download it today.
Any questions? Give me shout and I’ll get back asap :)
Comments